Creating a COVID-19 System Alert in HMIS
When do you create an Alert (Incident)? Create an Alert in HMIS (1) if client tested positive, (2) showed symptoms through agency's screening protocol, or (3) self-report to have symptoms.
Please note, creating an alert in HMIS does not replace the Minnesota Department of Health Symptom Alert System for Shelters (SASS) Survey. While the efforts are related, they do not overlap and participating in both will assist with monitoring and responding to possible COVID-19 cases in the homeless response system.
In this article
- Alert Visibility
- Creating an Alert in ClientPoint
- Creating an Alert in ShelterPoint
- When and How to Update an Alert
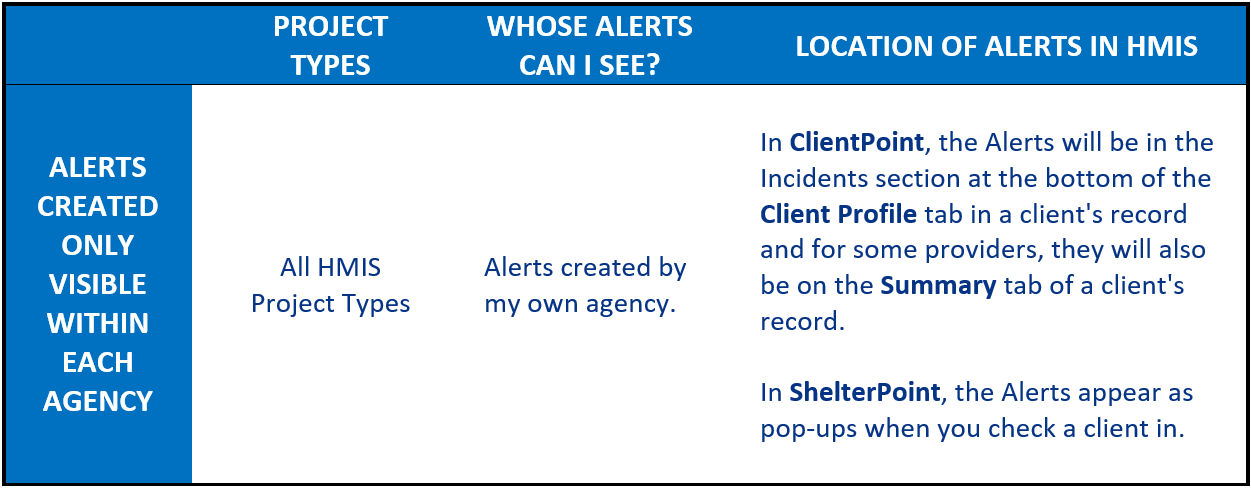
Alert Visibility
Creating an Alert in ClientPoint
Step-by-Step Instructions
- Enter Enter Data As (EDA) mode as the correct provider and open the client’s record in ClientPoint.
- For instructions on Creating a Client Record, visit our General HMIS Instructions.
- Once in the client record, click into the Client Profile tab
- Scroll down to the Incidents section and click Add New Incident
- In the Incident pop-up, fill out the following information. When complete, press Save.
- Provider: Confirm that your project provider is selected
- Start Date: Enter the date that COVID-19 Suspected or COVID-19 Confirmed was determined, this date may be in the past. If that date is unknown, use today’s date.
- End Date: Enter one month from the Start Date entered above (for example, if Start Date is 4/1/2020, End Date should be 5/1/2020).
- Incident: Choose COVID-19 Suspected or COVID-19 Confirmed
- COVID-19 Suspected: Showing Symptoms through Agency Screening OR Self -Report
- COVID-19 Confirmed: Positive Local Test and/or Positive CDC Test
- Ban: Select No
- Staff Person: Enter your name
- Sites Barred From: Enter applicable information (optional)
- Notes: Any notes that are helpful in this case for other homeless projects to know if they come across your alert (optional)

- Press Save & Exit.


What Will the Alert Look Like?
When an HMIS user enters a client’s record in ClientPoint, they will see the following alert at the bottom of the Client Profile tab when they access a client record:

Some providers may have Incidents displayed on the Summary tab in the client’s record, so the alert would also be visible there:

Creating an Alert in ShelterPoint
For providers that use ShelterPoint to enroll their clients, these instructions will provide steps on creating a system alert, using Incidents, that will help inform users at your agency of a COVID-19 Suspected or COVID-19 Confirmed case for clients in the HMIS.
NOTE: Incidents can only be added to enrolled clients using ShelterPoint. If a client is not enrolled in your project, you’ll need to create an Incident using the ClientPoint module following the instructions above.
Step-by-Step Instructions
- Enter Enter Data As (EDA) mode as the correct provider.
- Open your shelter’s unit list in ShelterPoint.
- Find the client’s name in the unit list and click on it.
- Scroll to Incidents and select Add New Incident. Fill out the following information in the pop-up. When completed, press Save.
- Provider: Confirm that your project provider is selected
- Start Date: Enter the date that COVID-19 Suspected or COVID-19 Confirmed was determined, this date may be in the past. If that date is unknown, use today’s date.
- End Date: Enter one month from the Start Date (for example, if Start Date is 4/1/2020, End Date should be 5/1/2020)
- Incident: Choose COVID-19 Suspected or COVID-19 Confirmed
- COVID-19 Suspected: Showing Symptoms through Agency Screening OR Self -Report
- COVID-19 Confirmed: Positive Local Test or Positive CDC Test
- Ban: Select Yes or No (Select Yes if you want this incident to prohibit enrollment into your emergency shelter project)
- Staff Person: Enter your name
- Sites Barred From: Enter applicable information (optional)
- Notes: Any notes that are helpful in this case for other homeless projects to know if they come across your alert (optional)
- Then click Save & Exit.


What Will the Alert Look Like?
When an HMIS user searches for a client’s ID in ShelterPoint, they will see the following alert pop-up:

This pop-up should alert you to initiate on-the-ground protocols.
When and How to Update an Alert
The only time you should update a previously completed alert is to add details about outstanding notes (e.g. test results). If you have new information on a client's COVID-19 Suspected Incident, we recommend opening the Incident and adding a note. Do not delete previous Incidents except for data entry errors.
Step-by-Step Instructions for ClientPoint Alert Updates
- Enter Enter Data As (EDA) mode as the correct provider and open the client’s record in ClientPoint.
- Once in the client record, click into the Client Profile tab
- Scroll down to the Incidents section and click on the edit pencil next to the Incident that needs updating
- In the Incident pop-up, add any notes about the outcome of COVID-19 test results. When complete, press Save.
- If the COVID-19 test result was positive, add a new Incident to document the COVID-19 Confirmed result.

Step-by-Step Instructions for ShelterPoint Alert Updates
NOTE: Incident updates can only be added to enrolled clients using ShelterPoint. If a client is not enrolled in your project, you’ll need to update an Incident using the ClientPoint module following the instructions above.
- Enter Enter Data As (EDA) mode as the correct provider.
- Open your shelter’s unit list in ShelterPoint.
- Find the client’s name in the unit list and click on it.
- Scroll down to the Incidents section and click on the edit pencil next to the Incident that needs updating
- In the Incident pop-up, add any notes about the outcome of COVID-19 test results. When complete, press Save.
- If the COVID-19 test result was positive, add a new Incident to document the COVID-19 Confirmed result.
