Creating a New Client Record in HMIS
Introduction
To use HMIS to track the assistance provided to a client, it is necessary to use an HMIS record associated with that client. Follow the data entry steps documented in the article to find an existing client record or to add a new client record to the system.
Data Entry Steps
- Search for an Existing Client Record: Confirm that it is necessary to create a new client record.
- Create a New Client Record: Add a new client record to the system.
- Document the Client's Sharing Preferences: Identify the record as shared or prevent other agencies from discovering it.
- Complete the Client's Profile: Fill out the Client Record and Universal Profile sections of the Client Profile tab.
- Add Household Members: Create additional client records and configure a household, if necessary.
Step 1: Search for an Existing Client Record
Before you add a new client record to HMIS, confirm that the individual does not already have a shared record in the system.
- Click on Enter Data As and select the provider that is serving the client.
- Select ClientPoint from the navigation menu on the left side of the screen.
- Search for an existing record by entering different combinations of the client's information into the Client Search fields, then clicking on Search. It is important to try different combinations because the client may have an incomplete record in the system.
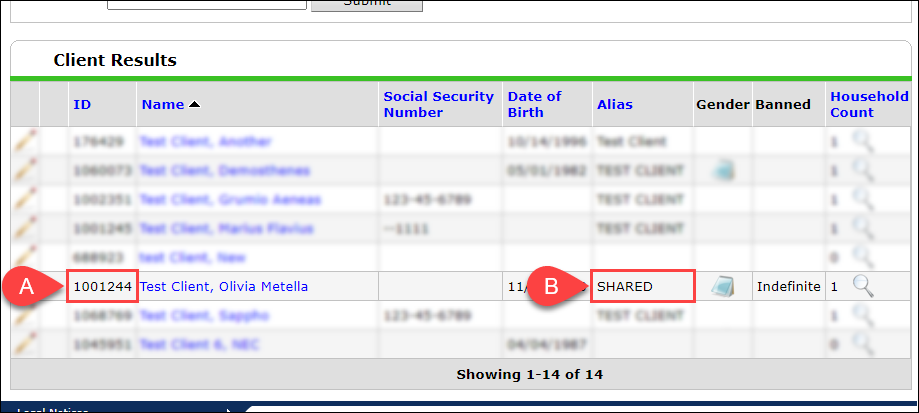
- If you locate a record whose information matches the client's, verify that it has a seven digit ID number (A) and the word "SHARED" is visible in the Alias field (B). You should use a record that passes both of those checks instead of creating a new record.
- If you cannot locate a record, or if the one you find does not pass both data sharing checks, continue on to the next section.
- If you locate a record whose information matches the client's, verify that it has a seven digit ID number (A) and the word "SHARED" is visible in the Alias field (B). You should use a record that passes both of those checks instead of creating a new record.
PLEASE NOTE: Skipping this step or choosing the wrong data entry provider can prevent you from locating client records or saving a new Entry/Exit with the proper level of visibility.

Step 2: Create a New Client Record
When there is no existing record to use, add a new client record from the Client Search screen.
- Fill in as many of the Client Search fields as possible before clicking on Add New Client With This Information.
 Screenshot: Make sure you have thoroughly searched for an existing client record (A) before adding a new one to HMIS (B). Never add an anonymous client record to the system (C).
 - Each time you open a client's record, you will be prompted to either set a "back date" or use the current system date. When adding a new record to the system, enter the date of the client's entry into your program in the Back Date field and select Set New Back Date.
 Screenshot: Setting a new back date (B) will temporarily change the system date (A). Any information you enter into the Client Profile tab will be stamped with that modified system date . A new back date can be set by clicking on the Back Date option found in the top right corner of the screen.


Step 3: Document the Client's Sharing Preferences
At the time of enrollment into a program, a client without an HMIS record must be presented with the HMIS Release of Information, which asks if they consent for their data to be shared with other HMIS-participating agencies. The client's decision must then be documented in their new record.
Client Consents to Statewide Data Sharing
There are two places on the Client Profile tab where a client's consent to participate in statewide data sharing must be documented:
- Click on the Client Record section's edit pencil to open a pop-up window. Add the word SHARED to the Alias field, then select Save.
 Screenshot: The word "SHARED" will appear on the Client Search screen, informing other agencies that they can add information to the record.
 - Scroll down to the Universal Profile assessment and record the client's Date of ROI Consent. This is the date the client consented to statewide data sharing on the HMIS Release of Information.
 Screenshot: A Date of ROI Consent should only be added to shared records, and only one date should be added per record. Do not save a new value over an existing date.


Client Does Not Consent to Statewide Data Sharing
Clients that do not or cannot consent to share their information with other HMIS-participating agencies must have their records "closed" to prevent unauthorized access. For step-by-step instructions on the closure process, see the Knowledge Base article Close a Record to Statewide Data Sharing.
Step 4: Complete the Client's Profile
The Client Profile tab must be filled out as completely and accurately as possible for each client record in HMIS.
- Select the Client Profile tab if you are not on that screen already.
- Click the Client Record section's edit pencil to open a pop-up window. Update any fields that are missing information, then click on Save.
- Scroll down to the Universal Profile assessment. Update any fields that are missing information, then click on Save.
 Screenshot: The Universal Profile consists of data fields that HUD and the State of Minnesota require be filled out. Some fields may not be used for some clients.

Step 5: Add Household Members
If the client is being served together with household members, everyone in the household must have a record created for them. When you have located and/or created records for everyone, review the Knowledge Base article Create a Household to determine whether a new household needs to be configured on the Households tab.