Community Cards
Date Created: 06/16/2022 | Date Updated: 06/22/2022
Introduction
Community Cards can be printed from the Client Profile tab in ClientPoint.
Steps
- Open the Client Profile Tab
- Verify That the Client's Information is Correct
- Print the Community Card
Step 1: Open the Client Profile Tab
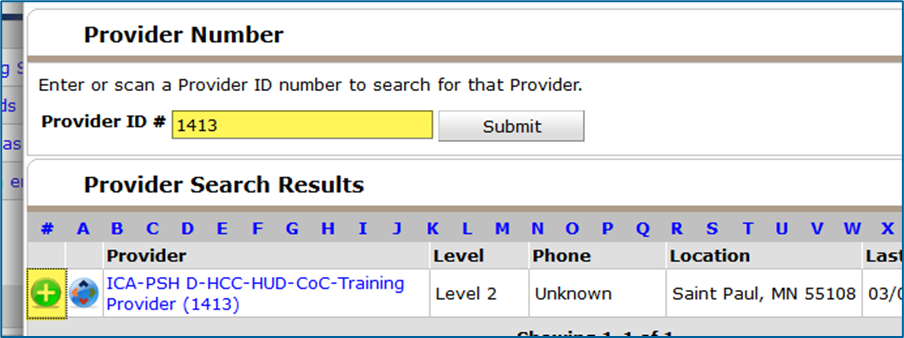
- Click on Enter Data As and select the provider that is working with the client.
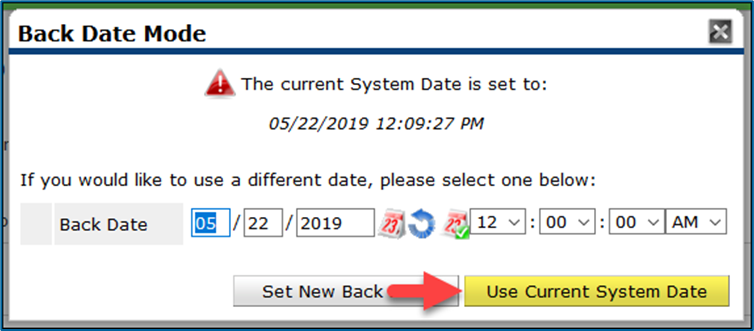
- Open the client’s record in ClientPoint. When prompted, select Use Current System Date.
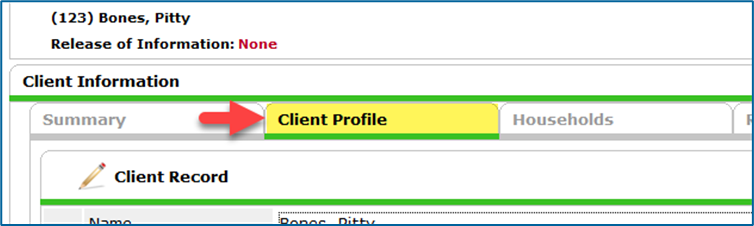
- Select the Client Profile tab.


Step 2: Verify That the Client's Information is Correct
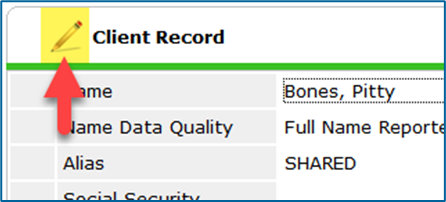
- In the Client Profile tab, verify that the client’s name has been entered accurately.
- If the client’s name has been entered incorrectly or there has been a name change, click on the edit pencil next to the heading “Client Record” and make the necessary updates in the pop-up. Select Save when you are finished.
- If the client’s name has been entered incorrectly or there has been a name change, click on the edit pencil next to the heading “Client Record” and make the necessary updates in the pop-up. Select Save when you are finished.
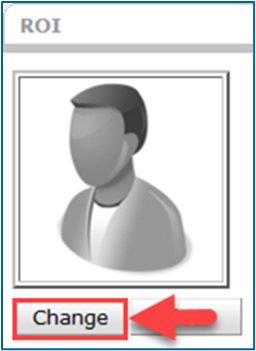
- Check whether the client record has a photo. If there is no picture, follow these steps:
- Take a photo of the client with a camera or webcam attached to your computer.
- Select Change under the empty portrait.
- Click on Browse in the Upload Client Image pop-up. When the File Explorer window appears, locate the picture file and double-click on it.
- Back in the Upload Client Image pop-up, select Upload.


Step 3: Print the Community Card
- Click on Issue ID Card and confirm that the following settings are selected:
- Paper Size: ID-1
- Issuer Name: None
- Image to Display: None
- Include Client Photo, if available: Checked
- Include Date of Birth: Not checked
- Include Signature Line: Not checked
- When you have confirmed that the settings are correct, select Generate ID Cards.
- A new web browser tab will appear. Press CTRL+P or click on the printer icon, then follow the prompts to print the Community Card.
- If there is an issue with the way that Community Cards are printing out, please contact the Helpdesk at mnhmis@icalliances.org.

Example Community Card for client record #1. Notice that the client ID number is displayed in two locations on the card.
Please note: For best results, Community Cards should be printed prior to scanning attempts. Scanners may not be able to read copies of cards uploaded to a smart phone or other personal computing device.