Using multiple assessments in one provider
Date Created: 8/11/2022 | Date Updated: 9/25/2023
Starting in October 2023, nearly all providers will have more than one required assessment assigned to their Entry/Interim/Exit.
- The primary assessment users will see upon creating an Entry/Interim/Exit will be a "core" one assigned based on the Project Type of that provider. For example, all Permanent Housing providers will see "Permanent Housing Core Assessment" upon creating a new Entry.
- Then, there will be separate tabs that contain the Entry questions specific to the funding sources associated with that program. If a provider has no HMIS-required funding sources, then there will be no additional assessments, just the primary Common one, to complete.
While this may come as a large shift to some end users/programs, many HMIS programs have already made this shift over the past few years. It's common practice these days for us to set up a provider with multiple funding sources, which already means many end users should have working familiarity with clicking through multiple assessments.
In this article
Creating an Entry
- Enter EDA mode as the correct provider and open the client’s record in ClientPoint.
- If entering data for a household, be sure to search for the head of household.
- When prompted, enter the date of the client’s entry into the project and select Set New Back Date. If the client entered the project today, you can select Current System Date. (The date can be changed by clicking on Back Date in the top-right corner of the screen).
- Click on the Entry / Exit tab and select Add Entry / Exit. Select the correct Entry Type for your provider from the Type drop-down menu.
- If entering a household, check the box next to each client included in the entry.
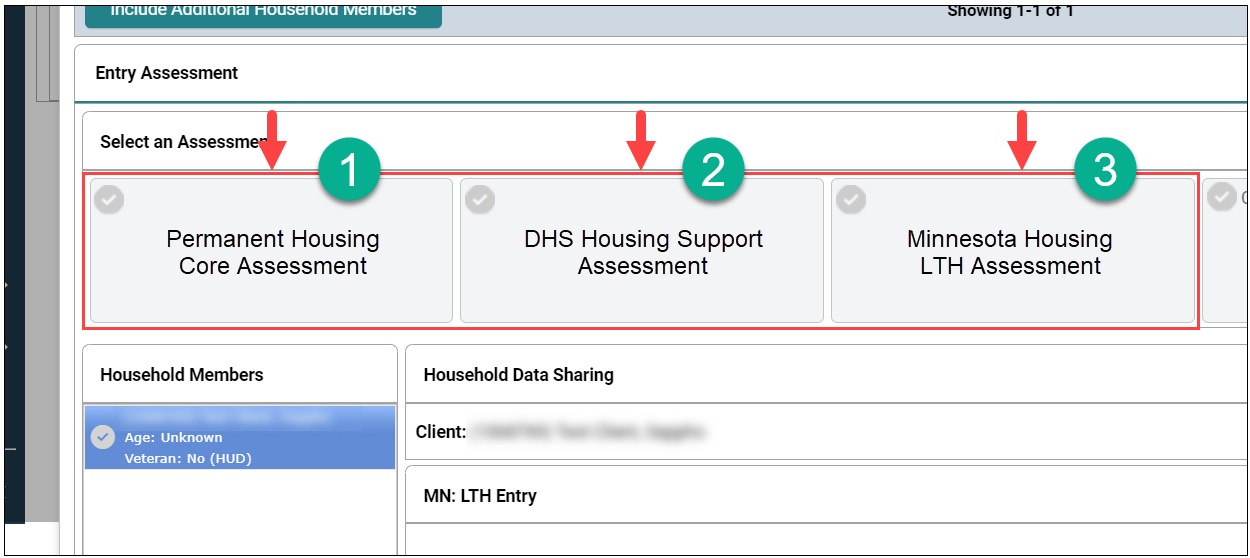
- For each client included in the entry, complete the data elements on the Entry Assessment in the Entry/Exit Data pop-up. This will be the project-type-based assessment (for example, Permanent Housing Core Assessment - #1 in screen shot below).
- If entering data for multiple household members, save time by clicking on Add Household Data and completing the Household Data Sharing Assessment.
- After you’ve saved the data elements on the Entry Assessment that appears by default, you will need to manually select any other funder specific Entry Assessment(s) that appear in the same Entry/Exit Date pop-up. For example, if this provider has funding from DHS Housing Support and MN Housing LTH/HPH, the end user should click on those boxes to complete those additional questions (#2 and #3 in screen shot below).
- After you’ve selected the additional Entry Assessment(s), you may proceed with completing any additional data elements for each client included in the entry. Then click Save & Exit.
Creating an Interim Update
- Enter EDA mode as the correct provider and open the client’s record in ClientPoint.
- Click on the Entry/Exit tab, then select the Interims icon for the correct Entry/Exit.
- In the Interim Reviews pop-up, click on Add Interim Review.
- For regular updates prompted by a client move or information change, select Update.
- If serving a household, be sure to include all applicable household members in the entry by checking the boxes next to their names.
- After you’ve saved the data elements on the Update Assessment that appears by default, you will need to manually select any other funder specific Update Assessment(s) that appear in the same Entry/Exit Date pop-up.
- For funder programs that require Annual Assessments: Complete an Annual Assessment within 30 days of the client’s anniversary into the project.
- Click on the Entry/Exit tab, then select the Interims icon for the correct Entry/Exit.
- In the Interim Reviews pop-up, click on Add Interim Review.
- Select Annual Assessment (all project types) from the Interim Review Type drop-down menu.
- If serving a household, be sure to include all applicable household members in the entry by checking the boxes next to their names.
- In the Entry/Exit Interim Review pop-up, review the Interim Review Assessment answers. Update any answers that are no longer correct with the newest accurate information.
Creating an Exit
- Enter EDA mode as the correct provider and open the client’s record in ClientPoint.
- Click on the Entry / Exit tab, then select the edit pencil (in the Exit Date column) next to the correct entry.
- If exiting a household, be sure to include all applicable household members in the exit by checking the boxes next to their names.
- Enter the correct Exit Date and Destination, then click on Save & Continue.
- Complete the Exit assessment for each household member.
- After you’ve saved the data elements on the first Exit assessment, you will need to manually select the other funder program's Exit assessment from the same Entry/Exit Date pop-up.
- After you’ve selected the Exit assessment, you may proceed with completing any additional data elements for each client included in the Entry/Exit record. Then click Save & Exit.
Reporting
For more information about your funder's reporting requirements, refer to the funder specific HMIS User guide's Reporting Guidelines section. User guides are on the Forms and Instructions page.
This article contains general instructions for utilizing multiple assessments within one HMIS provider. These instructions will supplement the information included in the General HMIS Instructions and Funder Specific User Guides but do not replace the instructions in those guides. Users should still be familiar with the data collection and reporting requirements described in the Funder Specific User Guides.
For More:
Further information can be found in our September Newsletter article
For some frequently asked questions, check out this newsletter article from our October Newsletter